The pressure of the gas enclosed in the container changes with the change of temperature. In order to have a unified standard for comparison, we usually take the relative pressure value of 20 °C as the standard value. When the density table is calibrated, it is converted into the equivalent pressure value at 20 ℃ according to the corresponding relationship between pressure and temperature, and then compared.
Latching recovery value check:
When the pointer of the SF6 Density Monitor is zero, inflate the relay slowly and uniformly. When the SF6 Density Monitor issues a latching action, record the pressure value at the ambient temperature at that time, and convert it into the equivalent pressure value at 20°C. This equivalent The pressure value is the latching recovery value of the SF6 Density Monitor.
Alarm Reply Value Check:
Inflate the SF6 Density Monitor slowly and uniformly. When the SF6 Density Monitor issues an alarm action, record the pressure value at the ambient temperature at that time, and convert it into an equivalent pressure value at 20°C. This equivalent pressure value is the value of the SF6 Density Monitor. Alarm reply value.
Overpressure recovery value calibration:
Inflate the SF6 Density Monitor slowly and uniformly to the FS5000 type. When the SF6 Density Monitor sends an overpressure signal, it starts to slowly and uniformly deflate the SF6 Density Monitor. When the relay overpressure alarm signal is issued, record the pressure value at the ambient temperature at that time. , and converted into the equivalent pressure value at 20 °C, this equivalent pressure value is the overpressure recovery value of the SF6 Density Monitor.
Alarm value calibration:
Inflate the SF6 Density Monitor slowly and uniformly to the FS5000 type. When the SF6 Density Monitor sends an overpressure signal, it starts to slowly and uniformly deflate the SF6 Density Monitor. When the relay overpressure alarm signal is issued, record the pressure value at the ambient temperature at that time. , and converted into the equivalent pressure value at 20 °C, this equivalent pressure value is the overpressure recovery value of the SF6 Density Monitor.
Blocking value calibration:
Deflate the SF6 Density Monitor slowly and uniformly. When the SF6 Density Monitor sends a blocking signal, record the pressure value at the ambient temperature at that time and convert it into an equivalent pressure value at 20°C. This equivalent pressure value is the SF6 Density Monitor. the blocking value of
Overpressure check:
Inflate the SF6 Density Monitor slowly and uniformly. When the SF6 Density Monitor sends an overpressure signal, record the pressure value at the ambient temperature at that time and convert it into an equivalent pressure value at 20°C. This equivalent pressure value is the SF6 Density Monitor. the overpressure value.
Features:
1. The relay calibrator uses an analog-digital hybrid single-cycle high-speed single-chip microcomputer as the core, which has rich resources, powerful functions, and strong data processing capabilities. Simple circuit, good stability and high accuracy.
2. The instrument can perform automatic calibration of pointer and electronic Density Monitors.
3. The initial state of 1~3 groups of contacts of the Density Monitor is any form (normally open or normally closed), and the response value and recovery value of 1~3 groups of contacts can be measured at the same time, so this instrument can adapt to all new and old forms of Density Monitors automatic calibration.
4. The instrument adopts 320*240 large-screen color liquid crystal display and Chinese character operation interface, which is simple and convenient to use.
5. During the measurement, the instrument simultaneously displays the current pressure, the pressure corresponding to 20 o'clock, and the ambient temperature. Solved the problem of on-site verification of SF6 Density Monitors.
6. The test process is automatic measurement, avoiding errors due to human factors.
7. The instrument can store 100 sets of measurement data and keep them permanently without loss, so that each measurement has traceability.
8. The instrument can upload the test data to the PC through the RS-232 interface, and automatically generate a special test data table.
9. The instrument can calibrate normal temperature pressure gauges and density gauges at any ambient temperature.
10. All instrument pipelines adopt imported quick connectors, which are convenient to connect and have low air leakage rate.
11. The instrument has a clock function inside, and the clock can be corrected at any time.
12. The instrument has a self-calibration function. After the instrument has been used for a long time, the instrument can be calibrated and corrected to ensure the calibration accuracy of the instrument.
13. The instrument adopts high-precision pressure sensor and the world's advanced magnetic fluid technology products.
14. The instrument is equipped with a variety of switch transition joints, and most switches can be calibrated without disassembly
15. Using a high-capacity built-in battery, the screen displays the battery level, which expands the use space of the instrument and facilitates on-site calibration.
The connection between the calibrator and the Density Monitor:
.
1. Confirm that the control power supply of the Density Monitor has been disconnected, and ensure that the Density Monitor can be calibrated without external power supply.
2. Connect the signal line between the calibrator and the meter to be calibrated
2.1 The blocking, alarming and overvoltage output of the Density Monitor are connected to the calibrator
Connect the three alligator clips with 'green, red and yellow' written on the seven-pin plug of the calibrator to one of the corresponding output terminals of the 'contact 1, contact 2, and contact 3' of the density meter to be measured (if there is this output, Connect or not), connect the three 'black' alligator clips to the other terminal of the corresponding output terminal of 'Contact 1, Contact 2, and Contact 3' of the density meter to be measured (connect if there is this output, otherwise do not use).
2.2 The 4~20mA output of the Density Monitor is connected to the calibrator
Connect the 4-20mA input signal 'red' crocodile clip on the four-pin plug of the calibrator to the positive end of the 4-20mA corresponding output terminal of the density meter to be tested (if there is this output, connect it, otherwise it is not used), connect the 'black' crocodile clip The clip is connected to the negative terminal of the 4-20mA corresponding output terminal of the density meter to be measured (if there is this output, connect it, otherwise it is not used).
3. Connect the gas cylinder to the air inlet of the instrument using the special gas circuit that comes with the instrument. Then connect the calibrated SF6 Density Monitor to the 'measurement port' on the instrument.
Precautions:
During the measurement, the instrument simultaneously displays the current pressure, the pressure corresponding to 20 o'clock, and the ambient temperature. Solved the problem of on-site verification of SF6 Density Monitors.
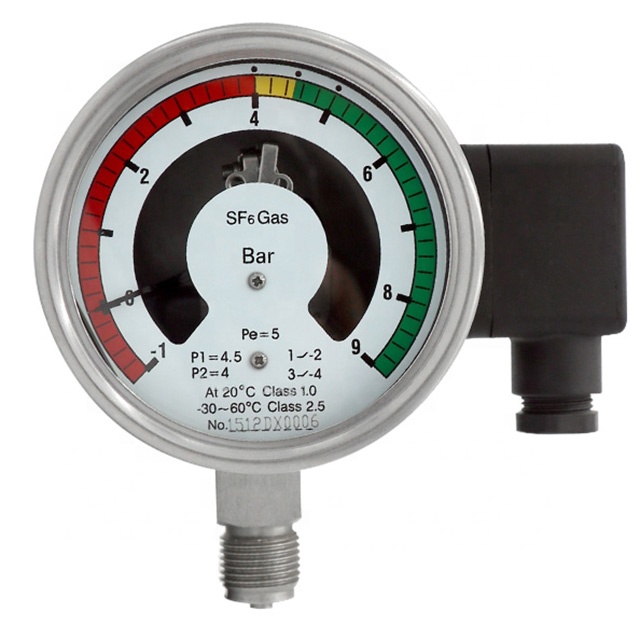 The principle, types and functions of Density Monitors